Welcome to Custom Woodwork by Fred. Family owned and operated we specialize in custom-designed wood piece including entertainment centers, wine cabinets, display cases, built-ins, bookcases, desks, beds, and other handmade wood furniture for homes or businesses. With over 30 years experience we take pride in our creative designs, professional craftsmanship and attention to detail.
We are located in Gibsonville NC. You will find information on our projects here and how some of our projects come together. We hope you enjoy what you find here.
While building any of our projects, there is always time between stages. Especially when waiting for a finish to dry or glue to set up. This is when I clean up the shop or move on to an outdoor project. Always something to do around the shop.
While cleaning, I find that I keep every cut off and scrap in a pile here or there. Over time it looks like a lumber yard for Lilliputian’s from Gulliver’s travels. At times I have to dispose of this material due to the amount. The preferred method is to re-purpose these materials into other useful things.
Small but useful
During a flooring project I collected cut-offs from a wood look vinyl floor. The kind that clicks together. It has a nice rustic gray color and it was made to be durable. The bottom has a thin insulation layer making it a good choice to re-purpose this into something useful.
My dog has been getting up there in years and needed something to assist her with eating. Raised dog bowls are nothing new and quite pricey. They assist the dog by raising the dish to a more comfortable position. Problem is I also have a cat. The raised dishes would make it difficult for her to reach the water. I extended the length creating a platform for said cat. I trimmed using leftover pallet wood from another small but useful project. Store-bought feeders did not offer a solution.
So here I have this material, time and design. The ideal situation to re-purpose the left-over material. However, this is only a small amount of material for one project. My finish is still drying on the wine cabinet project so I used the rest to make a few birdhouses. It only took about an hour after hanging them to have new tenants.
Multi-Functional Elegance:. Imagine a stunning piece that not only stores your favorite wines but also provides convenient storage for miscellaneous items in its charming “junk” drawers. The integrated bookshelves of the Legacy Wine Cabinet, add a touch of sophistication, making it a perfect fit for any living room.
The inspiration for this wine cabinet stems from a piece I crafted several years ago for my wife. Intrigued by its design, a client approached me expressing admiration for the cabinet and inquiring whether I would be willing to create a similar one for her. The foundational layout and specific requirements were conceptualized by my wife, serving as the guiding vision for this bespoke project. The images below are the original design.
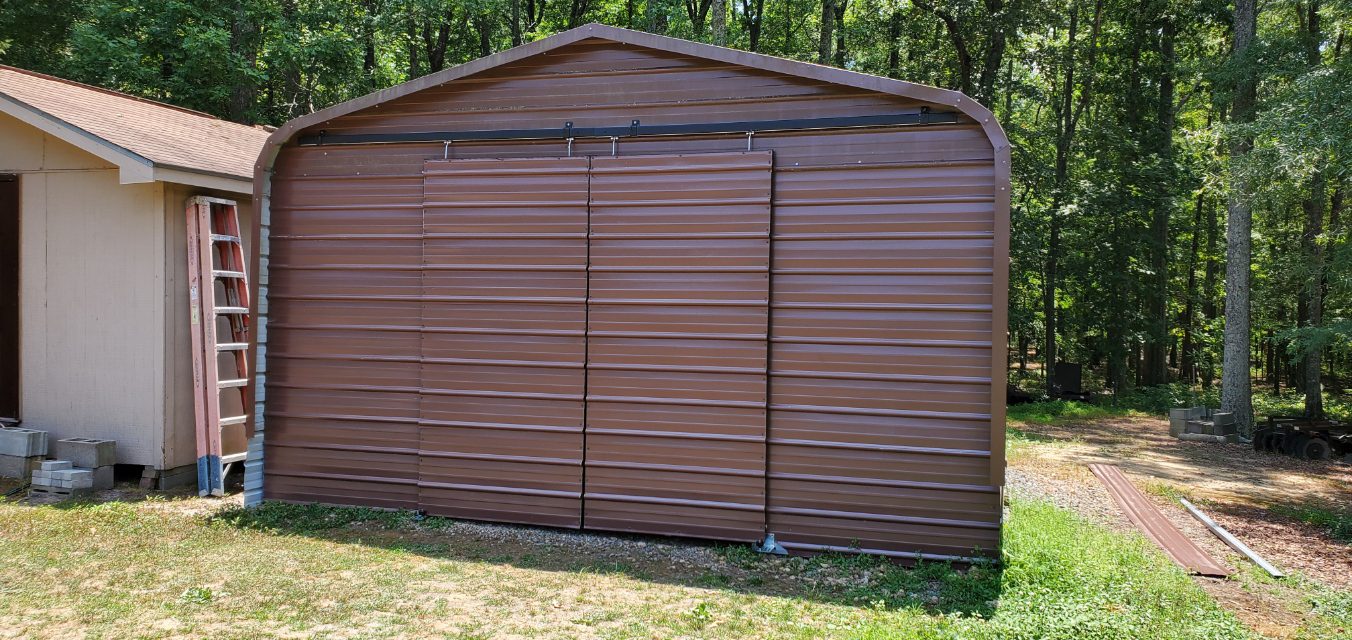
My neighbor had been looking to close off his car cover to hide his tractor and equipment from view of his home. He contacted several companies in the area but had no luck in finding anyone interested in a small project. At some point during our conversation it appears I had agreed to do this for him. The details are still fuzzy. The barn door Handles came to me while building his doors.
When we built our home across the street he was very inviting and has been there for us when we were converting our land from farming to our lawn.
With a project literally in front of me I discussed what he wanted to do and after giving him some ideas on what could be done (I think this is where he hired me. Again fuzzy) I convinced him that barn doors would be easier for him in his advanced years to open and close easily. He is in great shape and still works like a young man at 77.
The carport did not have a wall on the end. He purchased the steel and siding and we set to closing in the wall. He wanted a ten foot opening and we used the current header which created a 10 x 10 foot opening. I welded 2 doors from 1 1/2″ square steel tubing and used the same siding to match his carport.
My neighbor supplied all the material to close off the front of his cover. I explained what I was going to make for him and he helped where ever he could. The doors are very light for there size but also very strong once assembled. We purchased the track and hardware from Tractor Supply. He painted the track to blend better with the Cover.
We clamped a long piece of steel to the bottom of both walls to ensure that the walls are straight and plum with each other. We anchored the bottom of both walls with rebar stakes.
He purchased some cheap handles but I had already imagined the handles I would make for him.
He is the kind of guy that helps others but doesn’t do anything for himself. So I wanted to surprise him with these custom handles.
The handles appear small in the final picture but are actually around 18″ tall and are the same size as the 1 1/2″ square tubing giving them a substantial feel.
I used the left over steel from the doors to make “L” shaped brackets and welded nuts to the inside so they could be bolted from the inside of the door.
The letters are made from white oak. I dyed the wood with TransTint dye straight from the bottle. This is the same dye used in the Garden bench. A light sanding and second dye coat and finished with an automotive clear coat which really makes the color pop.
He was so shocked that someone would do this for him. To me it was just a way to say thank you for being a great neighbor.
Shou Sugi Ban or Yakisugi is a traditional means of preserving wood. Usually used as siding it provides water-proofing, insect resistant and fire retardant qualities. Yes you literally burn the wood! If you would like the technical information just click here. This was the perfect choice for my “Firewood Bench”
With my garden planted and the pond area cleared it was time to sit back and relax. The problem was no where to do that. I priced out buying a simple bench. About $500 on average. Even with the cost of pressure treated I could make maybe two benches for a hundred bucks. With inflation on the rise and material costs out of touch with reality I decided I would just get some pressure treated lumber and make a cheap bench to get me through until I could make something nicer over the winter. So a quick search for bench plans yielded a few ideas but I kept my design simple.
I figured there has to be a way to make at least 3 benches for around $100. During my search for plans I kept coming across articles about Shou Sugi Ban. I read a few articles and thought I could use regular lumber instead of Pressure Treated. So off to the store and picked up 3 2″x12″ by 10’s and 3 2″x6″x8′ construction grade lumber. I purchased Premium 2″x12″‘s for a nicer top. I did purchase 1 2″x4″x8’ pressure treated board. More on that later.
Tools
Propane torch (large)
Propane torch (small)
Stiff scrub brush
Heat resistant gloves (Oven mitts)
Air compressor
Blow gun
Wiping rags
I happened to have some tools here that I use for other maintenance tasks around the property. I have a Propane torch that was designed to burn weeds. It connects to a standard propane tank used for grills. It has a large burner and sounds like a jet engine when using it. This is definitely not for indoor use. You can use a typical torch for plumbing but for large areas the weed burner is the way to go. The small torch is good for detail work. The stiff brush is for cleaning after burning (Use gloves) The blow gun makes cleaning up after scrubbing easier but not required.
Construction
I built 2 benches with out using the Shou Sugi Ban technique. The only step that’s different is I burned all the wood prior to cutting or assembling bench #3.
After burning and scrubbing
The typical bench height varies from 16″ to 19″s. I chose 18″. With this in mind I subtract the thickness of the top (1.5″s) from 18″s leaving me with 16.5″ for the sides which are cut from the 2″x12″x10′ board. This would leave me with a 63″ top for the bench. This is where a decided to use the pressure treated 2″x4″.
Since this will be an outdoor bench in direct contact with the ground I erred on the side of caution and added this to the foot of the legs. So i need to subtract 1.5″ more from the legs. So the legs are now 15″ x 2.
To add a little character to the bench I decided to tip the legs in on a slight angle. I tipped the legs in at 5 degrees. It’s not much but is visually more appealing.
The top and bottom are cut at 5 degrees and the lower leg support are also cut to 5 degrees on each end. Simple cuts on the chop saw and a more interesting look.
I was able to make a roughly 5 foot bench top and legs from one 2×10 and the support from 1 eight foot 2×6. The feet are slightly wider than the legs for added stability.
The first two benches were left to naturally age. No finish of any kind. In time the should turn a light grey color.
Firewood Bench
For the Shou Sugi Ban bench I wanted to try this technique so I put a little more planning into the finish. Using the torch I burned the wood until some of it had charred. I then scrubbed with a stiff plastic bristle brush. Metal brushes remove to much material. I then cut the legs from the board and burned the ends of the top so the burning technique was done on all bench top surfaces and brushed again. I then thoroughly cleaned all the surfaces.
To add the color of choice, in my case red, I had some TransTint dye. I diluted the dye in water and made a few samples until I was happy with the result. I was surprised how well the grain absorbed the dye. I used the dye full strength on white oak for my Barn door Handle project.
With the dye dry I did a light sanding. The wood feels surprisingly soft. To make the color pop it needed a clear coat. The goal was a cheap bench so maintenance was not even a thought. So I had some Teak oil left over from an old project and decided that would be the least maintenance I was willing to do. The color really pops and after sitting in the sun and rain for some time now the color is still amazing.
This was just a quick project so I could relax by the garden or pond. They serve the intended purpose but as soon as I was done my wife decided she would like a bench with a seat back on it. Check back for a future post for a possible new bench project. Hope you enjoy the Firewood Bench project.
Like most of us, time seems to slip by and any good intentions we had get lost in day to day life. While trying to get caught up I came across past projects I had planned to post in a blog someday. I am happy that I had at least taken pictures as I worked on these projects.
I will be posting several of these projects that were made prior to our blog. The first up is a bathroom vanity in Brazilian Cherry for a home in Melbourne FL. This vanity was contracted by the home owner for a DIY installation so I will not have any pictures of the installed vanity.
This is the last photo I had of this project. I’m hoping to find the pictures of the matching medicine cabinets that flanked both sides and the center of this vanity.
Special Features
The simple clean lines were requested by the homeowner based on a drawing they provided. Although it seems like a basic vanity a few simple tweaks increase the functional use of this bathroom staple. This vanity is for the master bath which could not be increased in size so maximum storage was a requirement. The home owner provided a drop in sink and had some leftover laminate from another project which we incorporated into this project.
The base of this vanity features 4 drawers on either side offering ample storage for a couple to share. An additional group of drawers has been incorporated into the base of this cabinet. These drawers were designed to accommodate up to 36 rolls of TP freeing up cabinet space. A simple push to release drawer slide assembly and they pop open with a push of your toe. Larger items can be stored in the center cabinet also offering easy access to the plumbing.
Cabinet Interior considerations
This home is not far from the beach and Florida of course is humid. When constructing the cabinet material choice is an important consideration. Big box cabinets are typically particle board covered in paper i.e. a sponge. They come in standard sizes and limit your choices. Since remodeling is a major financial decision a little extra cost in material and flexibility in design, having a local cabinet maker construct your cabinets will make your investment last.
This cabinet is fabricated from a good quality plywood. The edges and the unseen surfaces are sealed with primer. The interior of this cabinet was laminated with countertop laminate. This will serve to protect it from the humidity of Florida as well as any leaks or spills that can occur. I try to do this with any cabinet that will have plumbing or sinks in them. In our Craftsman bath vanity we skipped the laminate but did seal all surfaces with primer and paint.
Some of our want list had to be delayed to replace a poor quality handrail installed by the builder. Needless to say the railing failed due to poor preparation and material selection. Upgrading a builder grade railing can add value to any home.
When learning how to remodel and build homes, my father always spent the time to hand select every 2×4, 2×6 etc. etc. I hated it. But as I got older I excepted the process and I just do it naturally. The reason I mention this is due to the material that was used to construct the railing we are replacing for this project.
As a force of habit I automatically go to the best quality material I can locate and scrutinize every piece. So this brings us to the choice the builder used. In the vast number of years I’ve been remodeling I have never stumbled across a finger jointed 2×4. This is the wrong choice for an outdoor wood project.
I know the builder chose this material because it is cheap and with a fresh coat of paint who would know. The choice of material is not the only mistake. During installation proper preparation did not occur. The exposed end grain was not sealed and I could not find any signs of a primer being used. Poorly prepped and a low quality paint job and the railing is destined to fail. The failure is the railing had rotted when exposed to the elements.
This project was not on the to-do list. The contractor who built the house used very cheap paint and after a few years, it showed. We decided to paint the family room and kitchen in the future but with all the rain this past year we moved forward and repainted. The original color was called Greige and is somewhere between brown and gray. Cleaning the paint without it showing was impossible and literally would wipe off as you tried. We opted to change the color to one that was slightly brighter and of better quality. We also applied primer over the original paint to ensure the new paint would last. For our High bar Renovation, we added to our painting project to tie the whole space together.
This post is not about painting the living space. We chose a neutral Grey which ties in better with the trim. However, when it came to the kitchen island we knew it needed something more. Also, the Grey did not contrast with the Granite countertop which is grey’s whites and blacks.
A client came to me and asked if I could make him an Oak side table as a Christmas gift. This was Mid December. Not one to say no I asked him what he was looking for. He asked for a simple table to sit beside his mother’s chair so she could enjoy the view of the property from the window. Sounds simple enough so I asked what type of wood he wanted and size and so on. “Well,” he says “Not to make it more difficult I have this tree I cut down a while back” Remember this is mid-December. Not deterred I pressed on and asked if I could see the wood and asked how long it had been cut down into slabs. He figured about a year or so.
I just happened to be between projects at the time and had wanted to work from slab to finished project for an upcoming project and thought the Oak side table would be a chance to see how it goes. Making no promises I agreed to take on the project. He provided several slabs and I began work.
In our previous post, we showed you how we built our Potting and Garden shed. We promised to add our upgraded shed in an upcoming post. Well, here it is. I knew I liked the Craftsman style but adding columns to a shed is a little overkill. While I traveled during my enlistment in the Navy the style of homes in the Northwest appealed to me. I saw how the Craftsmen style in the Northwest was used in that area and I knew I liked it. Looking back it probably was the furthest thing on my mind but it must have lodged in my brain.
The Craftsman-style homes in the Northwest use wood siding. In particular, Cedar shakes. They are a very versatile and durable material. The shingles (or shakes)can be installed in straight lines or staggered for a more rustic look. We chose the latter. Finding the shingles was a little difficult. I discovered they are quite popular for grilling. Since I am not in the Northwest I have to assume that’s why they are used in North Carolina. This is not a how-to post but more of a here you go what do you think.
Before UpdateAfter Update
In addition to adding the shakes, we added some more trim to the Barndoor and the eve of the shed. The additional detail ties the look together.
The Potting and Garden shed was built out of necessity and I didn’t think it would be post-worthy at the time of construction. This was June of 2016. The shed is just one of those things people build or purchase for its utility and nothing more. It houses all the things needed to tend to the yard and garden and some additional storage for those things you only need at certain times of the year.
The building is more than a basic Potting and Garden shed. We stick-built the shed rather than purchasing. We used 2″x4″ instead of 2″x3″ lumber at 16″ on center. The shed is made more like a house than a shed. We used a high pitch for the roof and a ridge beam to keep the interior space open.
With the shed roughed in, we added 2 access points. A standard walk-thru door for easy access when only needing to grab a rake or whatever and, a larger door for the mower.